Participants 286
-
 Anna
Anna
-
Popova
-
* * * 💷 Ваш аккаунт пополнен на 71598.36р. Подтвердите средства по ссылке: https://professionalheights.com/uploads/wntrxn.php?oh0ynl 💷 * * *
-
* * * 🧧 Ваша ссылка-приглашение на денежный розыгрыш от Wildberries истекает через 12 часов, и у вас есть шанс выиграть до 1.000.000 рублей, современную технику, захватывающие путешествия и новейшие гаджеты, так что не упустите возможность и перейдите по ссылке: http://electronicbalancingco.com/uploaded/yvyufe.php?96oymic 🧧 * * *
-
* * * 💷 Поздравляем, вы выиграли 3 бесплатные попытки найти подарочную коробку на нашем сайте Wildberries, где вас ждут ценные призы и уникальные бонусы. Переходите по ссылке: http://masonrthomas.com/upload/aqmaqq.php?0oo7sh (действует 24 часа) 💷 * * *
Reach audiences who already know you.Advertise to people who have visited your website, app, shop or Facebook Page.
Personalise every ad for every customer, automatically.Use dynamic ads that automatically show people items they’re most interested in.
Keep your loyal customers coming back.Build brand loyalty by showcasing new products to your best customers.
Before you begin
Prepare your customer list in advance
To make a Custom Audience from a customer list, you provide us with information about your existing customers and we match this information with Facebook profiles. The information on a customer list is known as an “identifier” (such as email, phone number, address) and we use it to help you find the audiences that you want your ads to reach.
Your customer list can either be a CSV or TXT file that includes these identifiers. To get the best match rates, use as many identifiers as possible while following our formatting guidelines. You can hover over the identifiers to display the formatting rules and the correct column header. For example, first name would appear as fn as a column header in your list.
Alternatively, we have a file template you can download to help our system map to your identifiers more easily. (You can upload from Mailchimp as well).
How To Upload a Customer List To Facebook
Facebook Business Manager can be an intimidating and confusing place at times, even for the most seasoned marketers.
It can be especially challenging for people who have never used it before but want to take advantage of leveraging their customer lists for targeting opportunities and don’t know where to start.
We’ve got your back with a quick and easy explainer on how to upload a custom audience customer list into Facebook.
1. Gather all of your website purchasers, subscribers, and other relevant data into a spreadsheet. This is the part that could take longer than 5 minutes. But if you’re using a CMS like Shopify, you should be able to export this list quickly and easily.
2. Next, format it so the columns go as follows: customer first name, customer last name, email, phone number, city, state/province, postal code, country, and value. For value, we typically recommend a customer’s lifetime value. For example, if a customer tends to spend a lot of money on your product, they would have a higher lifetime value. If you don’t have lifetime value, you are still able to upload the customer list without that information.
3. Save spreadsheet as a .CSV file.
4. Name the file clearly, for example “CRM | Website Purchasers | Date of Most Recent Data.”
5. Open up Facebook Business Manager and click on the 3 little lines in the top left corner next to Facebook Home (the 3 little lines are often called the website’s hamburger):
6. To the right, a side bar will pop up titled “All Tools.” Click on audiences.
7. Once the audiences page loads, click on the “create audiences” button. A dropdown menu will appear, select “custom audience.”
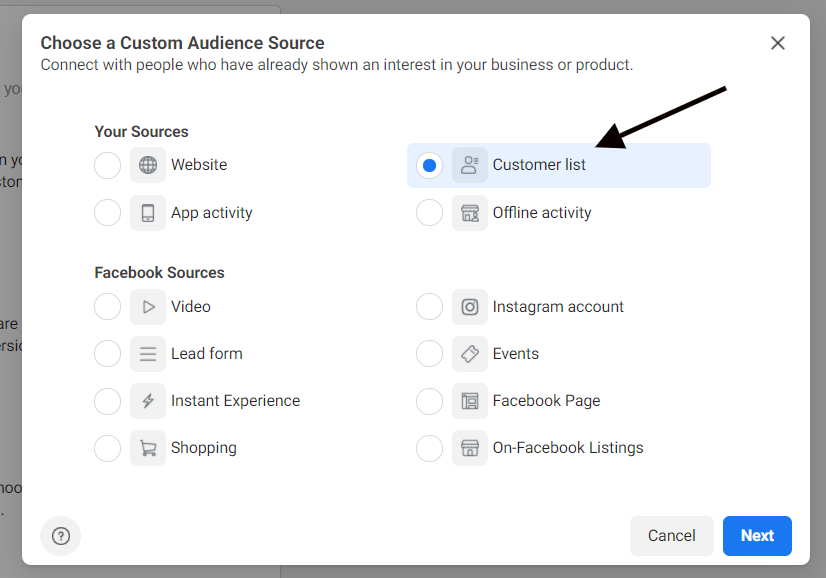
8. A variety of options will appear in the pop up window. Select customer list.
9. Under customer list, you can select among 3 options: use a file that includes customer lifetime value (LTV), use a file that doesn’t include LTV, or import from Mailchimp. Depending on step 2 and whether or not you include the customer lifetime value, select the first or second option.
10. Under Upload Your List, drag and drop the file, or click the upload button and add it from there.
11. Once uploaded, the name should auto populate properly, but if not make sure to fix it so you can distinguish this new audience from previous audiences.
12. Click next, and Facebook will ask you to choose your customer value column. Select the column that includes that data from the dropdown menu, it should be labeled as “value” in your spreadsheet. Note: do not use symbols such as the dollar sign in this column, just use numbers to designate the value.
13. Double check that all columns have been properly formatted and identified, that first name corresponds with first name, last name with last name, city with city, etc. You can change any columns that weren’t identified under the dropdown menu next to each column.
14. Then click upload and create in the bottom right corner. It will take anywhere from 30 minutes to an hour before the customer list is ready to be used in a campaign.
And that’s it!
Now you have a highly valuable custom audience that you can do almost anything with in your Facebook Ads campaign. Target the audience directly, test lookalikes based on it, layer it onto broad audiences and much more.